Or, how I learned to stop using Bandcamp and start embracing free and open music distribution tools.
This post is going to serve as a somewhat quick and dirty guide for tech-literate music producers to spin up your own Faircamp site. For those of you not comfortable with the steps I’m about to outline, there are Faircamp hosting services springing up, as well as other Bandcamp alternatives (see: me on Jam.coop).
What you will need:
- Music, preferably in a lossless format (WAV or FLAC for example)
- A place to host a website (Here is a budget choice which works well)
- FTP access to that website (beyond the scope of this article, but many service providers will give you FTP access for an easy way to transfer files)
- A system that is capable of running the faircamp package to generate your site. This post focuses on Linux specifically.
Getting Started:
I don’t think I will need to rehash a lot of the great information Simon Repp put into the faircamp manual. What I will say is, using Linux made things very easy. I was able to grab the faircamp .deb package for my Debian deployment, and install it using:
sudo dpkg -i /path/to/faircamp.debYour mileage may vary depending on the Linux distro you are using.
In my /home/user/Music folder, I created a folder called “faircamp testing” – because truthfully, I wasn’t initially sure this tool was going to work for my needs. The entire thing was at one point, one big test to me. You can name your working directory anything you want. At this stage, you are following the faircamp manual pretty closely, specifically with regards to folder structure and .eno files.
Once you’ve laid out your folder structure and populated your music files in the appropriate places, head to your terminal program. The goal is to get into your working directory and run the faircamp application, with the –preview flag so you can take a look at how the final product looks.
cd /home/user/Music/faircamp\ testing
# the backslash is because I have a space in the file name

faircamp --preview
# run with --preview to have faircamp run a local webserver so you can view the final product
Pay attention to the messages being printed to the command line at this point. I was impressed with how verbose the faircamp program is, and how helpful the messages are in correcting problems and implementing best practices for a deployment. For example – if you use .mp3 files as your source files, the faircamp application will gracefully scold you if you try to convert those to a lossless format.
A deep dive into your .eno manifests are beyond the scope of this post, but follow the reference section of the guide for all the juicy details on getting things right.
Uploading Your Faircamp Site
Fair warning – this part of my guide is highly specific to my Linux distro and host provider.
Depending on the size of your finished faircamp build, you might have some trouble moving all the files gracefully onto your hosting provider. My .faircamp_build folder was around 7.5 GB because I opted for lots of different music formats, and I have 10+ full albums. So if nothing else, keep in mind you will need to have at least that much space on your hosting provider. In Linux, you can do the following command to see how big your faircamp build is:
du -h .faircamp_build/
# the parent directory will be listed at the bottom
My hosting provider provides FTP access for moving files from my computer to my web server. This made it easy for me to move the files with a script, and I could do so in a way that ensured they were transferred completely and without any errors.
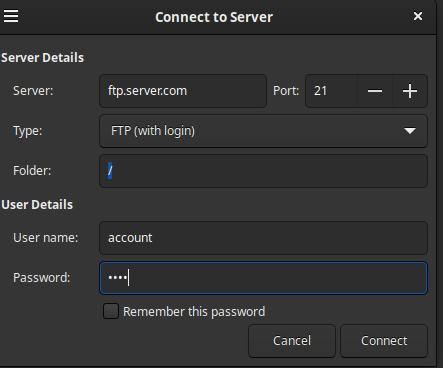
The first step here is to gather your FTP credentials from your hosting provider. You’ll need the username, password, ftp server address, and FTP port (typically port 21 – but might be changed depending on your host).
Next, I connected to my FTP account right from the Linux file explorer. Why do it this way? Because I wanted to keep things simple, mainly, but it also allowed me to manipulate odds & ends via drag and drop. In Cinnamon Desktop Environment, you can join an FTP account from the file explorer by navigating to File > Connect to Server, and inputting your information:
Here is the crux of the biscuit for this entire article: in Debian, when you connect to an FTP server, it’s mounted on the filesystem in a folder you can reach from the command line. The exact path may vary on your system, but it should be in /run/user/<Your-GUID>/gvfs/Ftp-Name-here – where your GUID would be your Linux userid (when in doubt, try 1000).
Since things are accessible via the command line, now we can safely move files using rsync, which gives us many benefits – the entire directory will be lifted-and-shifted over in one swoop, rsync checks to make sure things are moved intact, and we can have a repeatable process that does incremental updates (ie. only upload files that have changed in some way). To do this, I made a script that I could re-run in the future and take the guesswork out of it:
#/bin/bash

# faircamp builds the directories with incorrect permissions hence the first line:
echo "+ Changing file permissions in .faircamp_build/"
chmod 755 -R .faircamp_build/

# since file permissions are now correct, the only changes will be new files and anything changed:
# you can add --dry-run to the command below if you want to see what changes will happen before executing.
# this will delete orphan files as well! (meaning, if a photo no longer exists etc. in the build dir it will be removed from your FTP endpoint)
echo "+ rsync starting in verbose mode: "
rsync -rphv --size-only --delete --exclude '.well-known' --exclude '.htpasswds' --exclude 'cgi-bin' .faircamp_build/ /run/user/1000/gvfs/<your-FTP-path-here>
Some notes on the above code:
- I noted in the comments but faircamp builds the final product with permissions that are not suitable for web hosting, hence the “chmod 755” command on the 5th line
- You will need to plug in the correct path to your FTP folder in your filesystem on the last line
- rsync allows you to exclude folders from it’s scope – so in this case, I left out “cgi-bin”, “.well-known”, and “.htpasswds” – you can modify these as needed. If you don’t exclude them, they will be deleted when you run the rsync command
- rsync also allows for previewing the changes before it actually does any work. You would have to add the “–dry-run” flag to the last line
So what does this get us? You will run the faircamp command manually to build your .faircamp_build directory any time you make changes, then run the script above to change the directory permissions to be suitable for web hosting, then the script uploads things automatically. If there are existing folders on your hosting provider, rsync will only add/change/delete ones necessary, so you won’t be re-uploading the entire .faircamp_build folder every time.
Navigate to your site after rsync finishes and you should see everything populate – album art will appear, the music player should work, etc.
Summing Up & Thoughts on Faircamp
I think if you have read my previous blog posts, I had some concerns about the viability of faircamp for tech-challenged artists. Those concerns are still valid. This article is geared towards a slightly more tech-comfortable user in a very specific use case.
Faircamp is a simple, clean, well thought-out tool that empowers users to host their own Bandcamp alternative. There is a little bit of legwork to be done between the build stage and the hosting stage which I hope to alleviate for certain users via this post.
What I would like to see from Faircamp: volume control on the site (to be fair, I spoke to Simon about this via fedi and he pointed out Bandcamp doesn’t have those controls either); a way to download the entire discography at once; some way to track downloads or collect emails etc. for engaging with my fans, similar to what Bandcamp provides.
Leave a Reply
Comments are disabled, except those originating from the fediverse (Mastodon, Akkoma, etc.). Additionally, comments must be manually approved before they will appear here.